Deploying Azure Logic Apps using Azure Bicep - Infrastructure as Code
Recap
In the last the last post we deployed an Azure logic app using an ARM template and assigned MS Graph permissions using the Azure AD PowerShell module. There are several weaknesses in the previous post that this post will address.
- Infrastructure as Code
- ARM vs bicep
- Azure AD PowerShell module being deprecated
- Excessive permissions on the LogicApp
The Code
Want to skip straight to the good stuff? Just deploy the code using the button below or view the source on Github using the second button!
Introduction
In the previous post we deployed the logic app using an ARM template. This is a form of Infrastructure as Code (IaC). Using IaC to deploy your resources to the cloud allows for consistent deployments. Using source code such as an ARM template or an Azure Bicep file generates the same resources each time its deployed. This means there are no mistakes from manual deployment, version control is far simpler as you can manage the source file and update your resources efficiently, accurately and with scale.
There are many different templating tools for IaC, some are multi-cloud such as Terraform and Ansible which use .tf and .yaml file templates respectively to deploy resources across Azure, Aws, GCP, and more.
Microsoft has developed a few native tools for Azure, and because we are working exclusively with Azure for our logic app that is what we will use.
ARM / Azure Resource Manager
ARM uses .json file templates to template and deploy cloud resources in Azure, we used one in the last post to deploy the logic app. ARM templates are great as IaC and have all the advantages described above, but they can be quite challenging for a human to read.
As an example, the code snippet below, declares the paramaters for the logic app along with the resource type.
 "parameters": {
    "logicappname": {
      "type": "string",
      "defaultValue": "Automated-Secret-Expiry-Notification"
    },
    "location": {
      "type": "string",
      "defaultValue": "[resourceGroup().location]"
    },
    "sender_email_address": {
      "type": "string",
      "defaultValue": "alerts@customertenant.com"
    },
    "recipient_email_address": {
      "type": "string",
      "defaultValue": "support@yourtenant.com"
    },
    "microsoft_graph_url": {
      "type": "string",
      "defaultValue": "[format('https://graph.microsoft.com/v1.0/users/{0}/sendMail', parameters('sender_email_address'))]"
    }
  },
  "resources": [
    {
      "type": "Microsoft.Logic/workflows",
      "apiVersion": "2019-05-01",
      "name": "[parameters('logicappname')]",
      "location": "[parameters('location')]",
      "identity": {
        "type": "SystemAssigned"
      },
Azure Bicep
Azure Bicep is Microsoft’s latest tool in their IaC repertoire.
It is a far more concise and human readable alternative to the ARM template. Bicep creates ARM templates during deployment so it still uses the same underlying technology, additionally you can take an ARM template and decompile it to Bicep to make it easier to read and edit.
Why would we use ARM or Bicep over Terraform or another competitor though? Ultimately it comes down to personal preference. A key advantage of Bicep is that when a feature reaches GA in Azure, it is available in Bicep straight away, whereas with third parties you have to wait for them to be updated.
Personally, I really like using the VS Code Bicep plugin, it makes working with bicep files simple. Compare the snippet below to the ARM template above which is declaring the same paramaters and resources.
param logicappname string = 'Automated-Secret-Expiry-Notification' // This is just the default name
param location string = resourceGroup().location
param sender_email_address string = 'alerts@customertenant.com'
param recipient_email_address string = 'support@yourtenant.com'
param microsoft_graph_url string = 'https://graph.microsoft.com/v1.0/users/${sender_email_address}/sendMail'

resource workflows_Secret_Expiry_Notification_name_resource 'Microsoft.Logic/workflows@2019-05-01' = {
  name: logicappname
  location: location
  identity: {
    type: 'SystemAssigned'
  }
Much easier to read and much shorter!
The Tools
- Bicep extension for VS Code Install
- Azure Bicep Install
- Azure PowerShell Module Install
- Microsoft Graph PowerShell SDK Module Install
- Exchange Online PowerShell Module Install
Generating a Bicep File from an existing resource
If you followed along in the first post you would have already created the necessary resources. What if you wanted to deploy it again across tenants using Bicep? We can use Bicep to decompile ARM templates into .bicep files that we can work with.
Additonally we can use Visual Studio Code to import a resource from Azure directly.
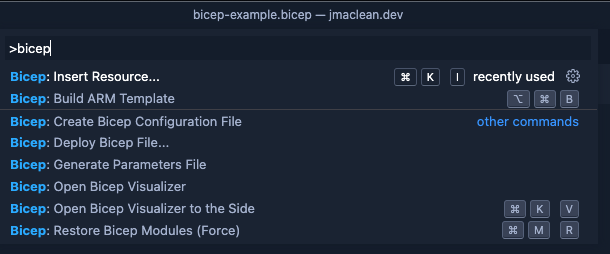
Create a new bicep file (Myfile.bicep), open the Visual Studio Code command pallete and use the >bicep Insert Resource… command.

Getting an ARM Template to work with
To start with we need an ARM template to decompile. In this example we will decompile an ARM template for the Logic App we have deployed, you can use the one provided in the repo above, or you can generate your own.
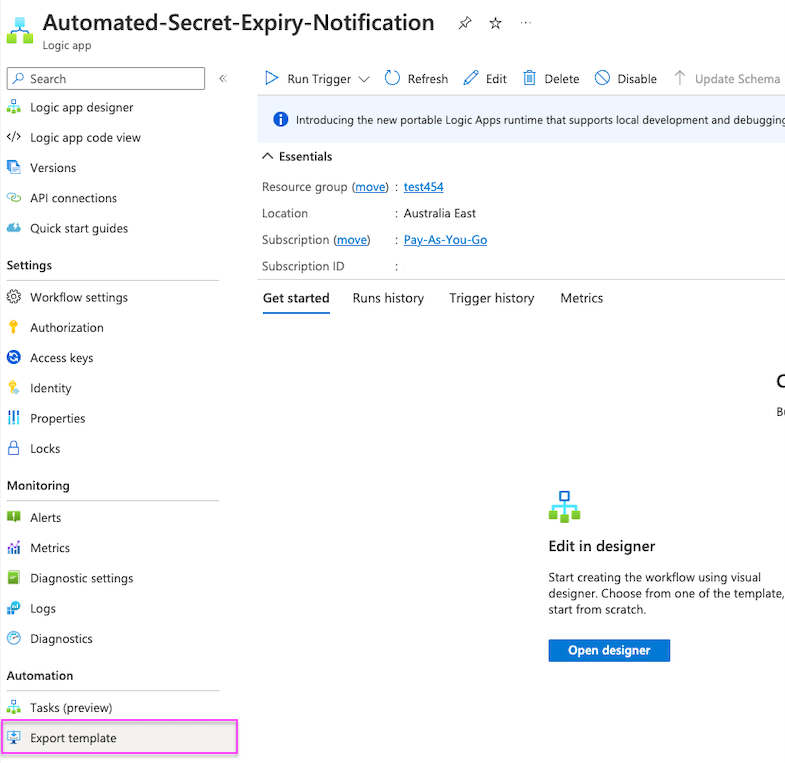
To generate an ARM template for an existing Logic App head over to the resource. Under Automation select Export Template

Then download the ARM template!

Exporting ARM Templates: You can download more than just logic apps as ARM tempalates, you can also export the templates using the Azure CLI and Azure PowerShell but that is beyond the scope of this post; check this documentation for more information Exporting ARM Templates .
Decompiling ARM to Bicep
If you have installed the Bicep tools above you can navigate to the path that includes the downloaded ARM template and run:
bicep decompile --file Filename.json
If you instead opted to install the Azure CLI, Bicep comes built in and you can run:
az bicep decompile --file Filename.json
Deploying the Bicep file in your tenant
You can deploy .bicep files using VS Code, Azure CLI and Azure PowerShell, my preference is Azure PowerShell.
Connect to your Azure Subscription using
Connect-AzAccount
Set your variables and deploy!
$ResourceGroup = "Your Resource Group of choice"
$BicepFIleName = "Local path to your bicep file"
$LogicAppName = "Not required if you are happy with the default"
$SenderEmail = "Email address you want to send from"
$RecipientEmail = "Email address you want to recieve"

New-AzResourceGroupDeployment -ResourceGroupName $ResourceGroup -TemplateFile $BicepFileName -logicappname $LogicAppName -sender_email_address $SenderEmail -recipient_email_address $RecipientEmail
You can pass the parameters for your bicep in-line as above and they will take precedence over the parameters in your file. You can also pass your parameters using a parameter file making for easy modification for different deployments, see the documentation here.
The next step is to assign permissions, this time using Microsoft Graph instead of the soon to be deprecated Azure AD PowerShell.
When connecting to Microsoft Graph using PowerShell you have to specify the scope of permissions. These permissions dictate what actions and changes you can and can’t make and can quite narrow or very broad.
For our purposes we will be using the Directory.ReadWrite.All and AppRoleAssignment.ReadWrite.All privileges. Connect to Graph PowerShell using the following cmdlet.
$TenantID = "Insert your Tenant ID here." #This is your tenant ID to use when connecting to Graph.
Connect-MgGraph -Scopes 'Directory.ReadWrite.All','AppRoleAssignment.ReadWrite.All' -TenantId $TenantID
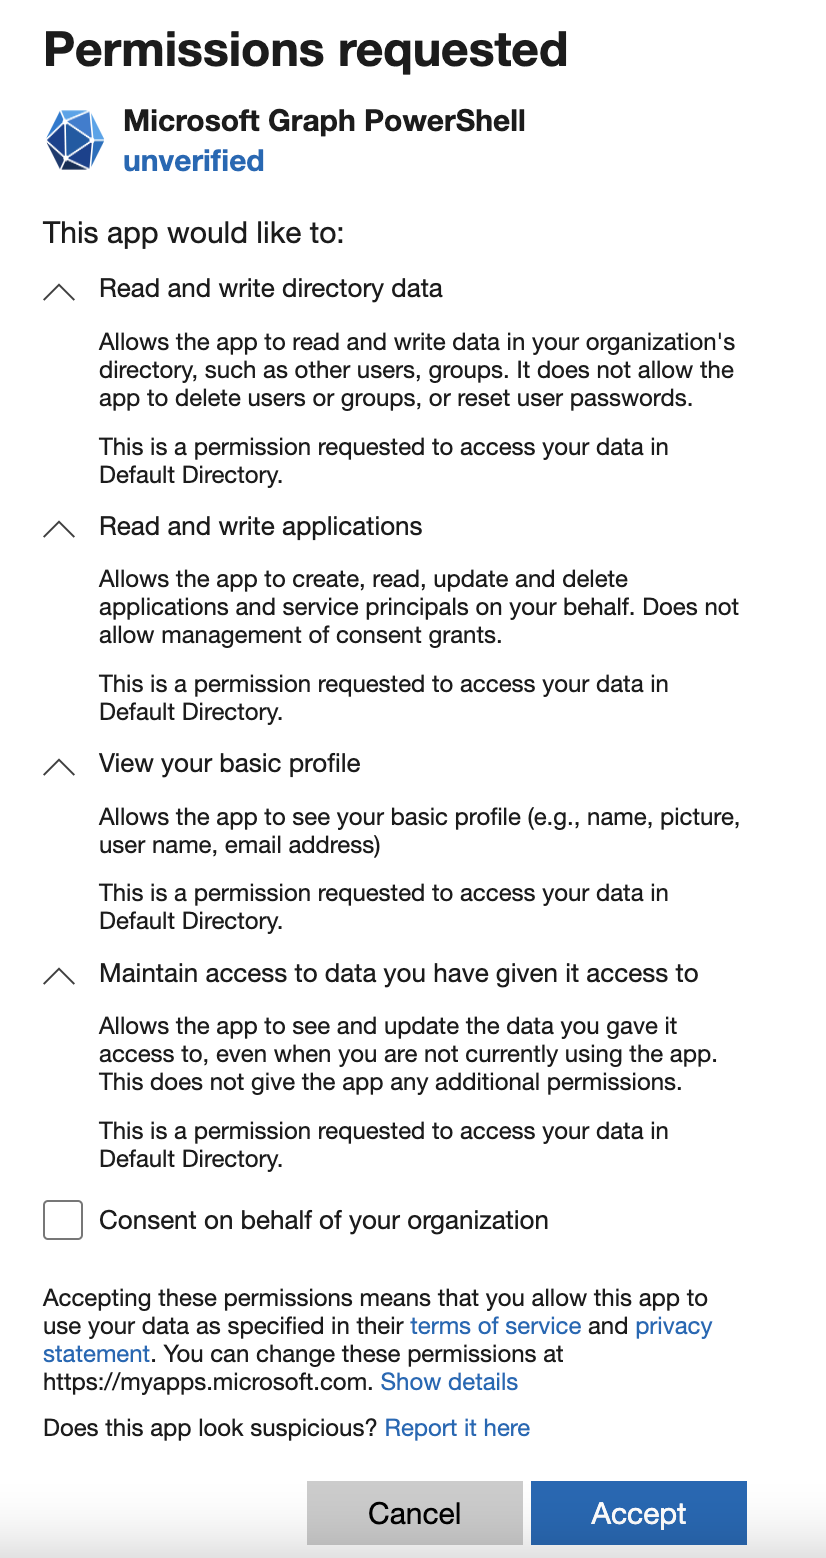
If you are connecting and authorising these permissions for the first time you can expect to see a pop up similar to this, be sure not to tick “Consent on behalf of your organisation”.

Once connected its important to identify the permissions we will be assigning:
- $Permissions - This variable identifies the Application.Read.All and Mail.Send Graph permissions. These are the permissions that the automation uses to view the applications and their secret expirations, and send email on behalf of the specified mailbox. This is the permissive permission that will be limited later.
- $GraphAppID - This variable identifies the Microsoft Graph Application ID. This is a static ID across all tenants.
- $LogicAppName - This variable identifies the application that will get the permissions.
Bringing those variables together gets the App Role permission ID and then assigns them both using the New-MgServicePrincipalAppRoleAssignment cmdlet.
$Permissions = @(
        "Application.Read.All"
        "Mail.Send"
        )

        $GraphAppId = "00000003-0000-0000-c000-000000000000" # Don't change this.
        $LogicAppName = "Automated-Secret-Expiry-Notification" #Change this if you have added a custom name to your application in deployment.
        $AutomationServicePrincipal = Get-AzADServicePrincipal -Filter "displayName eq '$LogicAppName'"
        $GraphServicePrincipal = Get-AzADServicePrincipal -Filter "appId eq '$GraphAppId'"

        $Approle = $GraphServicePrincipal.AppRole | Where-Object {($_.Value -in $Permissions) -and ($_.AllowedMemberType -contains "Application")}

        foreach($AppRole in $AppRole)
        {
        $AppRoleAssignment = @{
            "PrincipalId" = $AutomationServicePrincipal.Id
            "ResourceId" = $GraphServicePrincipal.Id
            "AppRoleId" = $AppRole.Id
        }

        New-MgServicePrincipalAppRoleAssignment `
            -ServicePrincipalId $AppRoleAssignment.PrincipalId `
            -BodyParameter $AppRoleAssignment `
            -Verbose
        }
Notice: Excessive permissions should always be removed if they aren’t needed, including the permissions granted to Microsoft Graph PowerShell in this instance.
Application deployed, permissions assigned. Now its time to limit the scope of the permissions available to our automation. In short, the Mail.Send permission is a very permissive permission and allows for sending mail as anyone, that could be the CEO, finance team, HR team etc. This is not required and creates a large surface area for attack, as anyone having write access to the logic app is able to send an email from anyone.
Relying on secure resources in an Azure subscription is not enough. It is best to restrict the applications ability to send mail on the exchange side as well. This is done by creating an ‘Application Access Policy’ in Exchange Online. In short, when paired with a security enabled distribution group - this limits an applications scope to the mailboxes defined within the distribution group. You can read more here: Microsoft Documentation.
To make this work, we need three things
- The Azure Logic App ID - Defined earlier as $AutomationServicePrincipal
- A mail enabled security group - created as part of this process
- An application access policy - also created below
$SenderEmail = "Sender@Tenant.com" #Enter the email address you set the application to send on behalf of"
$AutomationServicePrincipal = Get-AzADServicePrincipal -Filter "displayName eq '$LogicAppName'"
        Connect-ExchangeOnline
        New-DistributionGroup -Name "LogicApp Group" -Alias logicapp -members $SenderEmail -Type security
        New-ApplicationAccessPolicy -AppId $AutomationServicePrincipal.id -PolicyScopeGroupId "LogicApp Group" -AccessRight RestrictAccess -Description "Limit LogicApp  to only send emails as specified email"
Finished! A logic app deployed reliably and with Azure Bicep, permissions assigned using Microsoft Graph and the scope of those permissions restricted as appropriate using an application access policy.
I’ve grouped all of the above into a PowerShell script that allows this to be deployed relatively quickly which you can find here.
Code Below
$ResourceGroup = "Example1" #Declare your preferred resource group, if it does not exist it will be created.
$SenderEmail = "sender@example.com" #Preferred sending address in the tenant where the application will be deployed.
$RecipientEmail = "recipient@exmaple2.com" #Recipient for the report.
$TenantID = "Your Tenant ID goes here." #This variable is used to assign the MS Graph permissions
$LogicAppName = "Automated-Secret-Expiry-Notification" #Call the application whatever you like, this is the default.
$BicepFileName = "Biceptemplate.bicep" #Generic, can be changed but keep the .bicep suffix
Invoke-WebRequest -URI https://raw.githubusercontent.com/james-maclean/Azure_Public/main/Automated-Secret-Expiry/Automated-Secret-Expiry-Notification.bicep -OutFile $BicepFileName
function Add-MSGraphPermissions
{
    try
    {
        Connect-MgGraph -Scopes 'Directory.ReadWrite.All','AppRoleAssignment.ReadWrite.All' -TenantId $TenantID
        Write-Output "Preparing to add permissions"
        #Edit the below permissions as required for any applications you deploy
        $Permissions = @(
        "Application.Read.All"
        "Mail.Send"
        )

        $GraphAppId = "00000003-0000-0000-c000-000000000000" # Don't change this.
        $AutomationServicePrincipal = Get-AzADServicePrincipal -Filter "displayName eq '$LogicAppName'"
        $GraphServicePrincipal = Get-AzADServicePrincipal -Filter "appId eq '$GraphAppId'"

        $Approle = $GraphServicePrincipal.AppRole | Where-Object {($_.Value -in $Permissions) -and ($_.AllowedMemberType -contains "Application")}

        foreach($AppRole in $AppRole)
        {
        $AppRoleAssignment = @{
            "PrincipalId" = $AutomationServicePrincipal.Id
            "ResourceId" = $GraphServicePrincipal.Id
            "AppRoleId" = $AppRole.Id
        }

        New-MgServicePrincipalAppRoleAssignment `
            -ServicePrincipalId $AppRoleAssignment.PrincipalId `
            -BodyParameter $AppRoleAssignment `
            -Verbose
        }
        Write-Output "Graph Permissions Assigned"
    }
    catch
    {
        Write-Output "$_"
    }
}
function New-ResourceGroup
{
    try
    {
        $ResourceGroupExists = Get-AzResourceGroup -ResourceGroupName $ResourceGroup -ErrorAction SilentlyContinue

        if ($Null -eq $ResourceGroupExists)
        {
            Write-Output "The specified Resource Group does not exist, creating now"
            $ResourceGroupLocation = Read-Host -Prompt "Please enter your preferred resourcegroup location. Example: australiaeast, eastus"
            New-AzResourceGroup -Name $ResourceGroup -Location $ResourceGroupLocation
        }
        else
        {
            Write-Output "$ResourceGroup already exists, no further action required"
        }
    }
    catch
    {
        Write-Output "$_"
    }
}

function Remove-ExchangePermissions
{
    try
    {   $AutomationServicePrincipal = Get-AzADServicePrincipal -Filter "displayName eq '$LogicAppName'"
        Connect-ExchangeOnline
        New-DistributionGroup -Name "LogicApp Group" -Alias logicapp -members $SenderEmail -Type security
        New-ApplicationAccessPolicy -AppId $AutomationServicePrincipal.id -PolicyScopeGroupId "LogicApp Group" -AccessRight RestrictAccess -Description "Limit LogicApp  to only send emails as specified email"
    }
    catch
    {
        Write-Output "$_"
    }
}

Write-Output "Connecting to Azure"
Connect-AzAccount
Write-Output "Creating Resource Group"
New-ResourceGroup
Write-Output "Deploying Azure Bicep Template"
New-AzResourceGroupDeployment -ResourceGroupName $ResourceGroup -TemplateFile $BicepFileName -logicappname $LogicAppName -sender_email_address $SenderEmail -recipient_email_address $RecipientEmail
Write-Output "Adding Microsoft Graph Permissions, please sign-in"
Add-MSGraphPermissions
Write-Output "Limiting Exchange Permissions to the single mailbox required,"
Write-Output "Connecting to Exchange"
Start-Sleep -Seconds 3
Remove-ExchangePermissions
Write-Output "Script completed."

